NetCICD is a network automation framework developed from the start as a structured pipeline. It takes an industrial approach for network deployments, given the bulk nature of network changes.
In a series of blogs I take you through the steps required to get a NetCICD pipeline up and running using the NetCICD github repo and local instances of Gitlab, Jenkins, Ansible/AWX and VIRL on VMware Workstation.
Prerequisites for success
Be aware that the technical setup is the easy part of the transition to automation. The real difficult part is convincing your colleagues that industrial style automation helps in their daily work. Often this requires a culture change, although proper introduction of NetCICD may also be a catalyst for this.
In addition, most organisations lack a structured product model to be used with automated delivery. Such a model, with the associated product decomposition, is required to keep automation manageable. You may look at the TM Forum SID Product Specification ABE as an example. I use one of the earlier models (12 or 13) for this, the current model is almost impossible to follow for mere mortals that do not eat, sleep and breathe UML and know all of SID. In addition, remember that SID is designed to cater for the largest incumbent Service Providers and thus combines the best, but also the worst (complexity) of that.
Learn more about this on Cisco Live 2019 in Barcelona
Our Principal Architect Mark Sibering has been asked to present his network automation project on Cisco Live in Barcelone (Jan 28 – Feb 1). Interested in his story and key leanings? Register below.

CI/CD/CD
The setup described in this series of blogs is fit for an initial deployment of a Continuous Integration/Continuous Delivery/Continuous Deployment (CI/CD/CD) pipeline.
This is quite a mouth full and sounds more complicated than it actually is. It basically means that new developments are integrated with the production environment as fast and often as possible, preferably in small steps.
In the Continuous Integration (CI) stage, testing is automated to such an extent that the quality of the delivered change is 100% correct.
In the Continuous Delivery (the 1st CD) stage, the integration of the change into the production environment is also automated, taking care that changes are introduced in a controlled and predictable manner. But the deployment itself is still after a manual trigger, allowing for timed releases.
In the Continuous Deployment (the 2nd CD) stage, the automation goes full circle. Every change that passes all tests is automatically deployed to production without any delay or manual intervention.
As such, you can view the deployment of CI/CD/CD as a waterfall like roadmap, although Agile purists will not like me for saying this.
Will a change to CI/CD/CD be permanent? Nope. Each major change will most probably push you back in maturity, as your testing needs to prove itself again.
The NetCICD pipeline
In order to achieve what I described in the previous paragraph, you need to make a structured setup that can provide a solid foundation for CI/CD/CD. In NetCICD I use the following setup:
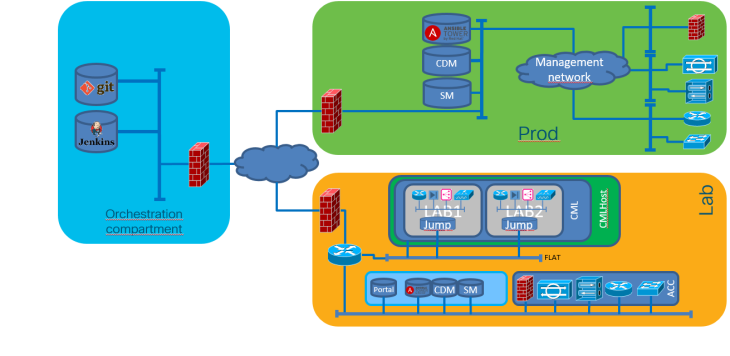 The NetCICD setup consists of three zones.
- What you see in yellow is the starting point: the LAB. Your Network Architect may create something locally on a laptop, but as soon as it is copied to the LAB, it becomes shared property. Therefore I take the LAB as the starting point for the pipeline.
- The blue zone contains the gold of your organisation: it is the orchestration compartment, where your templates, credentials and workflows are stored.
- The green zone is your production environment.
NetCICD stages
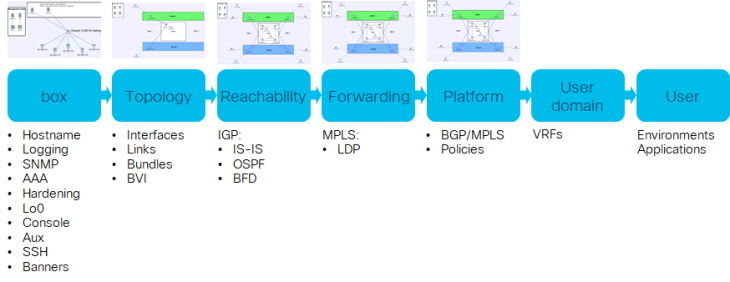
Creating a change in NetCICD is a structured process. Depending on the change, it needs to be incorporated in one of (at this point) seven stages: box (locally significant parts), topology (interfaces), reachability (IGP), forwarding (MPLS), platform (MP-BGP), user domain (VRF) or user.
This allows each stage to have a minimalistic network setup containing just that what is needed to test the features configured. Minimalism is essential in automation: it allows you to fail fast, and the faster you fail, the sooner you find any errors. And finding errors quickly saves an enormous amount of time, effort and thus money.
Test Driven Development (TDD) and Behaviour Driven Development (BDD)
When a piece of network configuration code is created, it is important that it is included into the correct stage. Each stage contains not only the configuration code, but also the test protocols for the configuration code.
More important: you should start out with writing tests. This may seem cumbersome, but in fact it is what you do already.
Let me give an example. Say you want to know what your devices are doing and how healthy they are. Moreover, you want the device to send messages when something is not OK. This is the desired behaviour referred to in BDD.
In order to make the device communicate about its status, you decide to configure syslog. In order to make sure you that syslog is functioning correctly, you compose test scenarios you want the device to react upon with syslog messages, you create the scenarios and see if the logging arrives. This is TDD: write the tests first, then create the required config to make the tests pass.
The change process
The change process (Continuous Integration) itself is a six-step process:
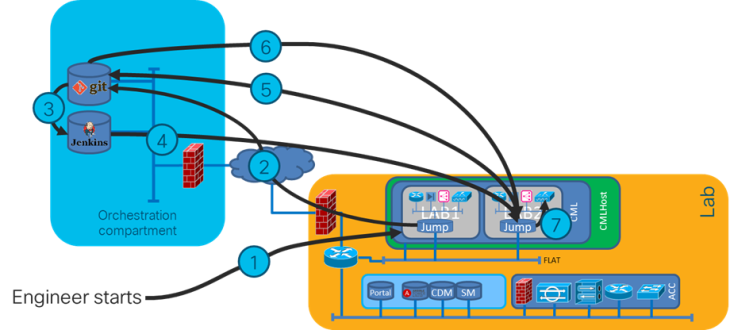
It starts with an engineer making a change (1). As soon as the change is made and is saved, it is pushed into source control (git, step 2), a tool borrowed from software development. The good thing about this is that you can immediately see who made which change, on which date, and if the committer also duefully added the required comments you may even know why. And in source control it has become part of the shared knowledge of the team.
Now the CI magic starts. An orchestrator, Jenkins in the case of NetCICD, registers the save action in source control (3) and boots a controlled testing environment (4) for each block. Next, the corresponding deployment and test script is loaded into the testing environment (5, 6). In each testing environment a deployment is made following the defined workflow, followed by a number of tests specific for that configuration block (7).
When all tests pass, Jenkins signals source control that the tests have passed and that the change is ready to be incorporated into production (step not shown). It depends on the source control software how this process runs.
When any of the tests or workflows fail, the process stops, jenkins reports a failure and leaves the status as-is. This allows you to investigate what went wrong, fix it and try again.
Deployment
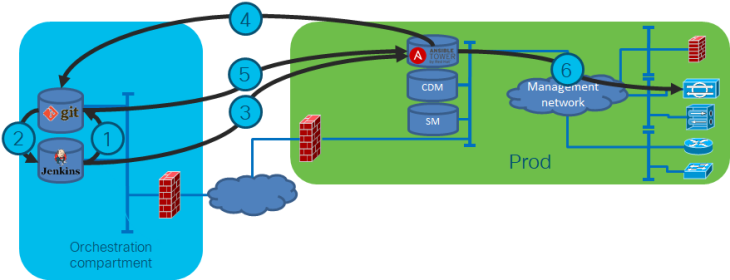
As soon as the merge request (1) is passed to source control, a process starts in which the team assesses if the change is doing what it needs to do. It is good practice to have others validate the change. This has a dual purpose: first of all a four-eyes principle: no single employee can push a change out without others knowing and understanding the change. Second, it creates a shared responsibility. Pushing out a change to production is a team responsibility. That is why normally I suggest to have at least two others to validate a change.
But, you may ask, what if the change needs to be made urgently in the middle of the night? In my opinion, the process above is especially important in these cases. I’ve been there too often when someone is too tired to correctly assess the impact of the change proposed, breaking more in the deployment than was broken before. And worse, in the rush to deploy they forget how to roll back EXACTLY. Now you are in for some high profile trouble shooting. You want to prevent this. And this is how you do that.
So, your team pushes the tested and validated change out to production, Jenkins picks this up (2) and notifies Ansible Tower of a new configuration (3). Ansible Tower gets the new config (4, 5) and runs it against the production environment (6) in check mode.
I feel it is good practice to have Ansible run in check mode before deploying. This gives an additional validation point in which you can decide if the change has the desired effect or not.
If all is OK, the change can be deployed. And, as every config is in git, rollback is easy. Not only are all proposed changes in the Jenkins log, also the execution is logged. You know exactly what happened. And you can always deploy the previous commit from scratch.
Next
Now you understand what the pipeline must do, it is time to start building. First stop: the simulation environment. I use VIRL/CML as most of my customers use Cisco equipment and as I know this kit best. This second blog of the series will be published in the coming weeks.

