
When you’re going to demo your newly developed Mule 4 application, you will be faced with a few common questions. For example, how do we re-use properties? How can we manage properties in a single place? Can we encrypt properties? How do we hide certain properties? etc.
Though, there are some blogs and Mulesoft documentation around this topic I thought of giving an attempt to write my own version of doing this in Mule 4 and Anypoint Studio 7x.
The goal is to share experience and to make it as simple as possible and straight forward as it can be.
I created a very simple Mule application to demonstrate this in practice.
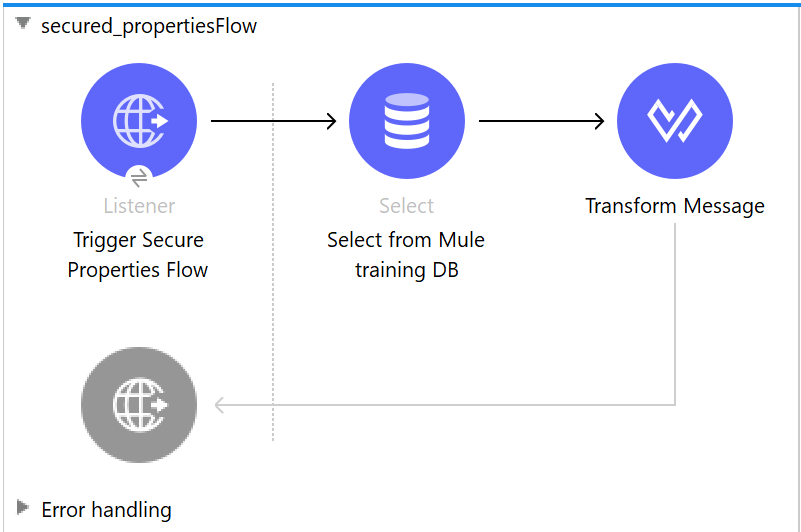
We have an HTTP listener to trigger the flow. Next, we have DB Select operation to get a couple of rows from the Mule training database and finally we transform the output into any structure we would like in response.
Applying secured properties to DB configuration parameters.
Now we will apply secured properties to DB configuration parameters. I will explain this according to a couple of steps.
STEP 1 – Create config or properties file
Create the new file under src/main/resources and give it a name. For example; dev-config.yaml. This will be our main place to store all configurable properties for our development environment. Similarly, you can create as many property files as you may need.
We will define our properties and hierarchies as we need them to be inside this file. For example;
db:
host: “db-hostname”
port: “db-port”
user: “db-user”
pass: “db-password”
database: “db-name”
Later on we will see how to reference encrypted values in this file, but for now this is enough.
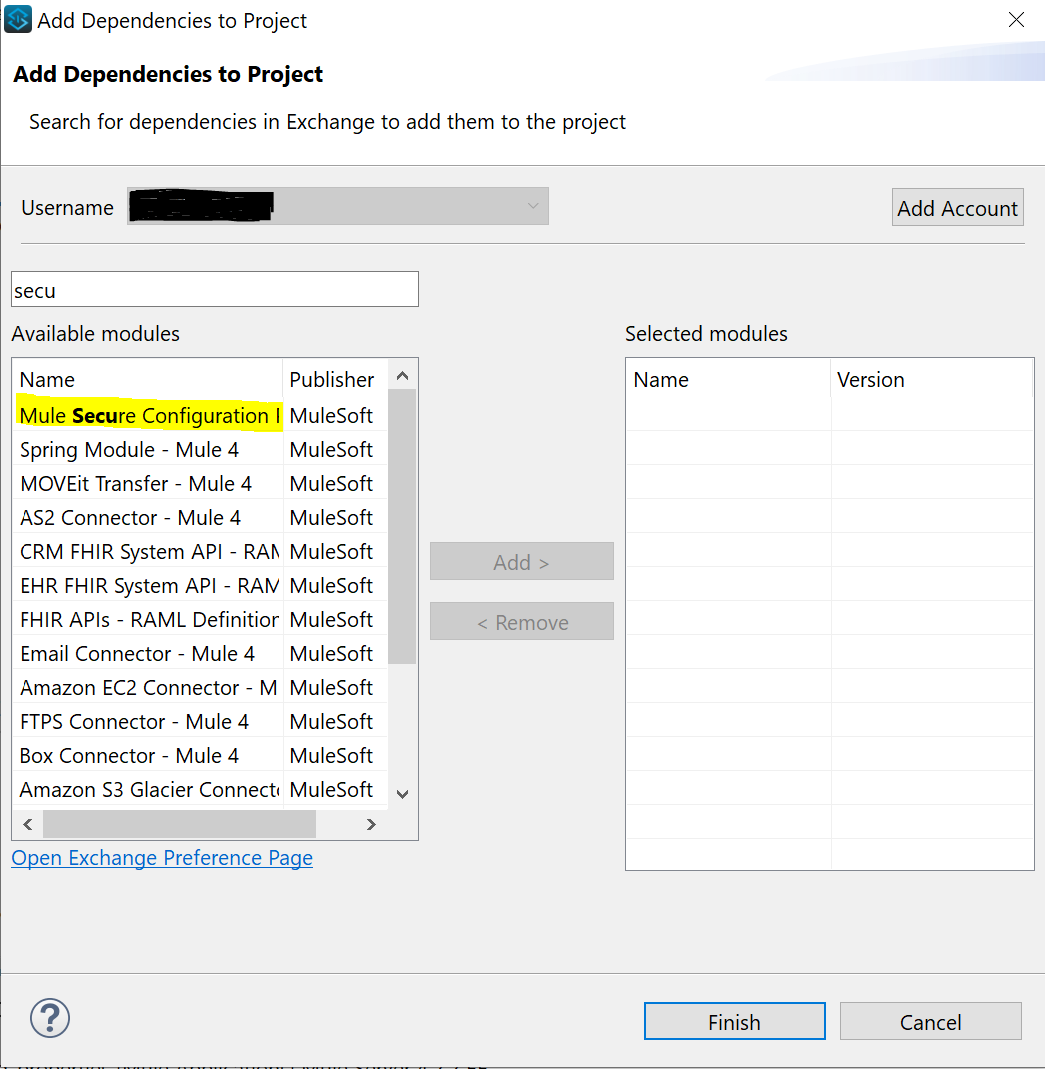
STEP 2 – add secure properties module to your project
Click on Add Modules and drag-and-drop from right to left.

If Security Properties module is not available in your scenario, you can download it from Exchange. In that case choose: Search in Exchange and type something like “secure” in search bar > Choose Mule Secure Configuration > click Add and Finish. Do make sure you are logged in, in case search does not return any results.
STEP 3 – Encrypt properties
During this step I came across a very interesting finding. There are multiple ways to encrypt your properties.
- MuleSoft documentation suggests you download and use the jar file.
Commands to encrypt/decrypt (replace key with key value)
java -jar secure-properties-tool.jar string encrypt Blowfish CBC key “string to encrypt”
java -jar secure-properties-tool.jar string decrypt Blowfish CBC key “encrypted string”
This is practical in case you’re not allowed to have access to encryption key and someone else will execute these commands and provide you with encrypted values. Later-on that key will be injected during the deployment, in order to be used by your application to decrypt property values. This is when the development team is separated from operations and operations would like to own and manage keys and deployment properties.
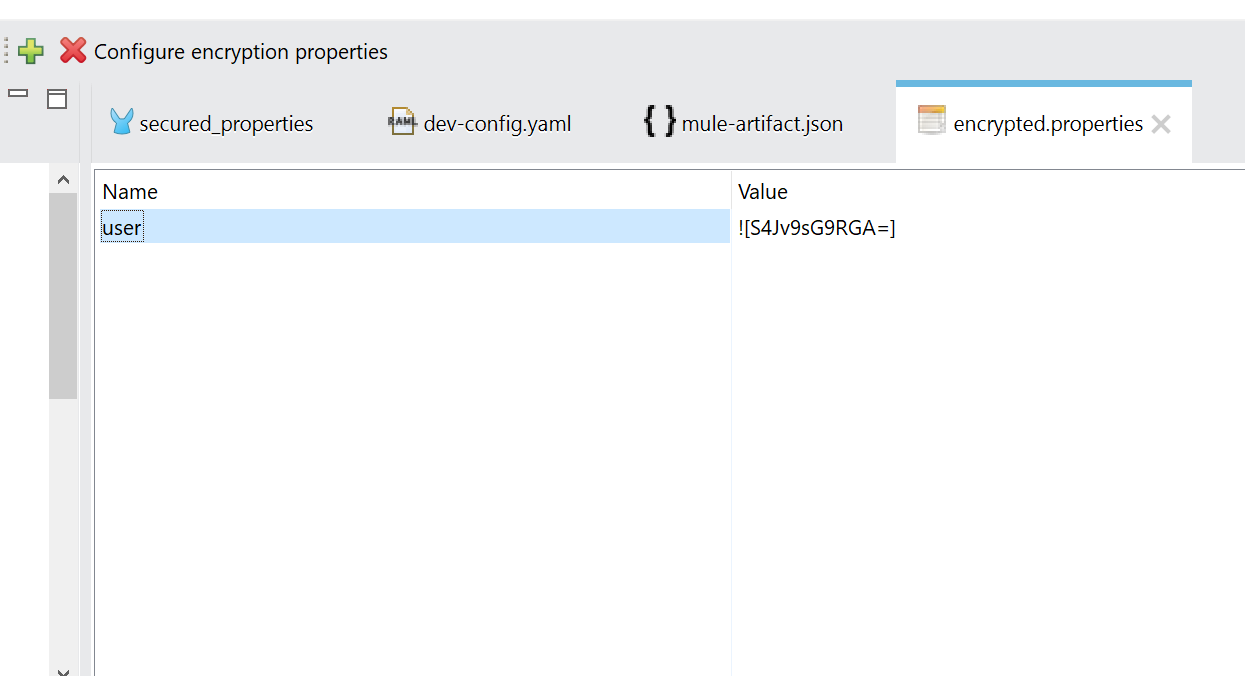
- You can use Mule Properties Editor. This is easy to use, but it comes with its own constraints which I will explain here and how to go around it. My assumption is that this is something used prior to Mule 4 and apparently still can be used with small workarounds. If you are requested to encrypt properties and store encryption key somewhere else, then I would go this route.Create another .yaml or .properties file in the src/main/resources and give it a name like: dev-encrypted.properties. Then right click on it and choose Open with. Search for Mule Properties Editor. You have option of managing properties in table editor or text editor.
Click on the green plus sign to add new properties.
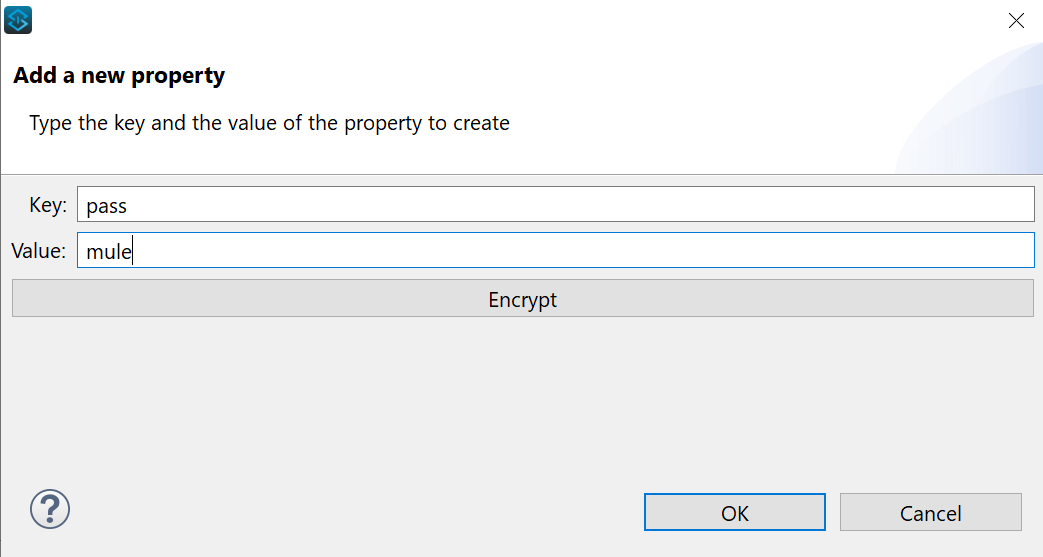
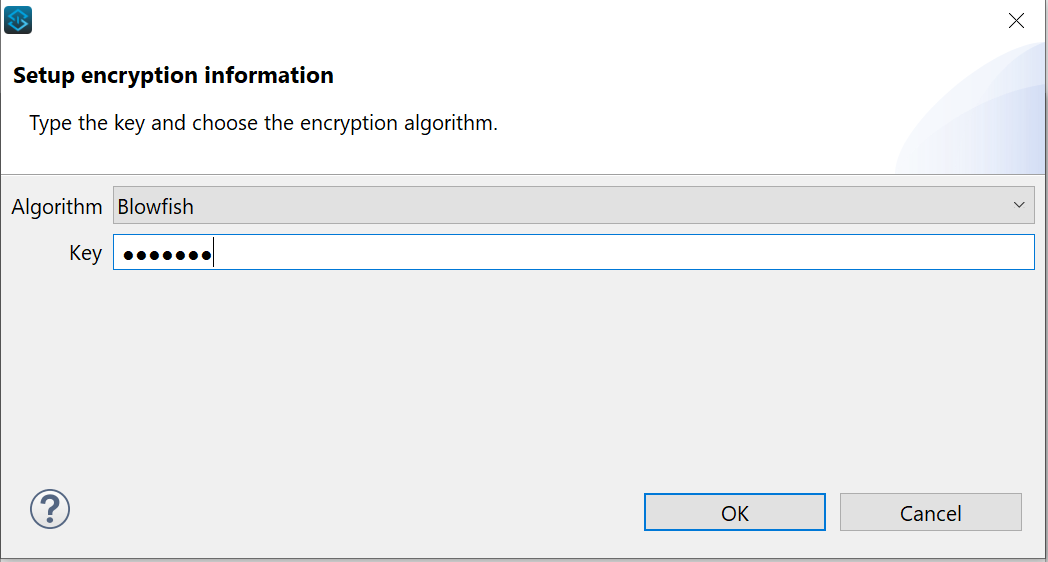
You now have the option to encrypt the property immediately or later on. For now we only use this file for encrypted values, so we will choose to encrypt. Click OK when it asks you to pick an algorithm and supply encryption key.
Now your property is encrypted using your algorithm of choosing and your encryption key.
Switch to text editor to investigate how the properties are represented.
propertyname=![encryptedvalue]
Ideally, we would like to do this directly on our dev-config.yaml, but the constraint that I mentioned earlier does not allow this. It basically converts property structure into this format key=value without any hierarchies, while Mule 4 properties are represented with key:value and they allow for hierarchies such as we saw in db properties:
db:
host: “db-hostname”
Anyhow, what’s important is that we have the encrypted values that we can now paste into our dev-config.yaml file.
STEP 4 – Register your secured configuration properties in global elements
Go to your main xml flow and navigate to Global Elements.
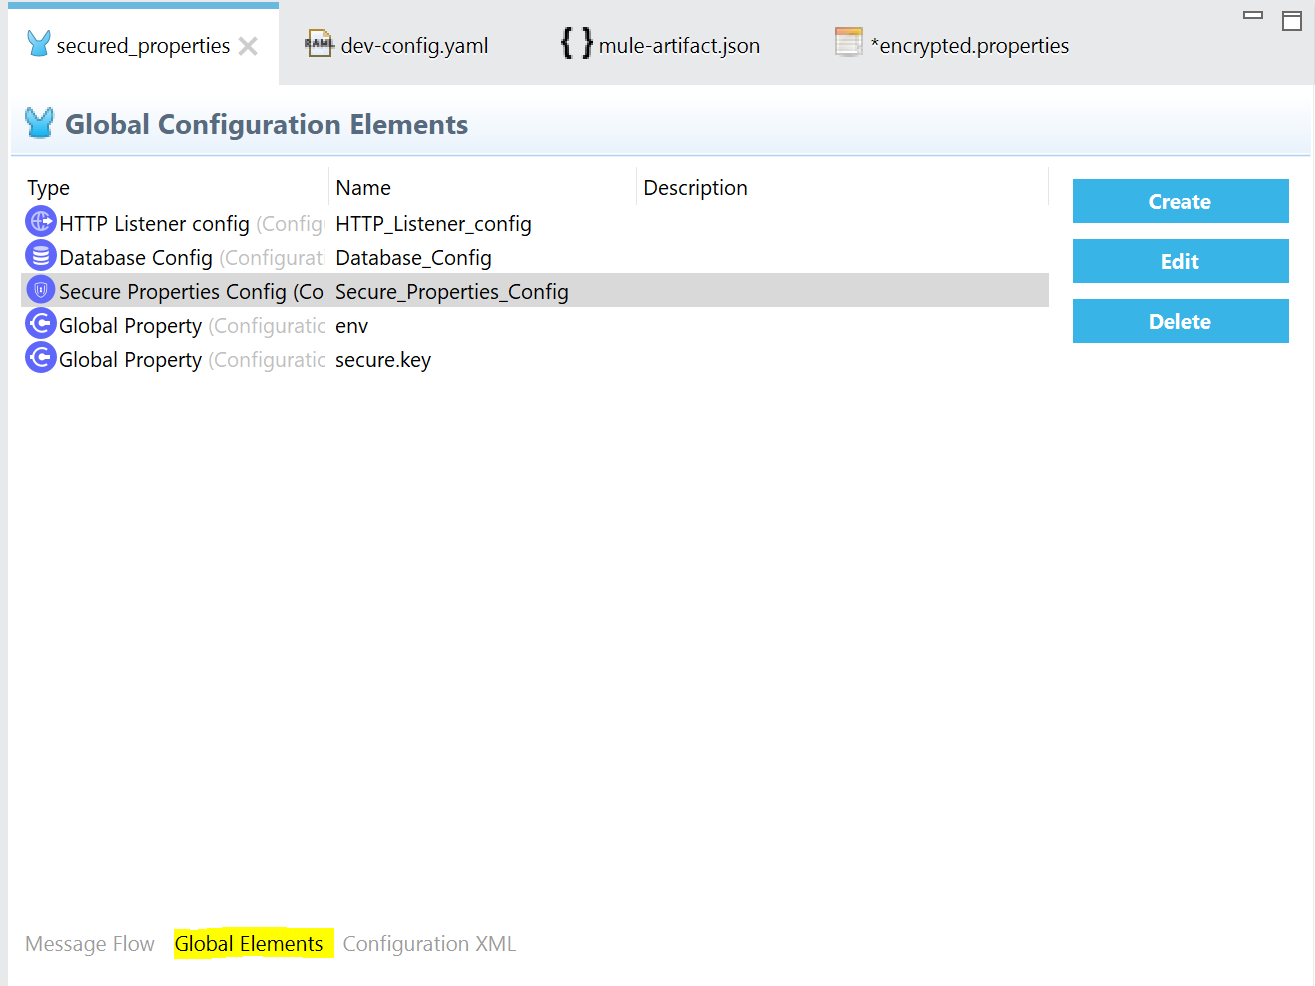
Click on Create and navigate to Connector Configuration and choose Secure Properties Config.

You can also search for Secure Properties to select it and click OK.
Investigate options which you have in the Secure Properties Configuration.
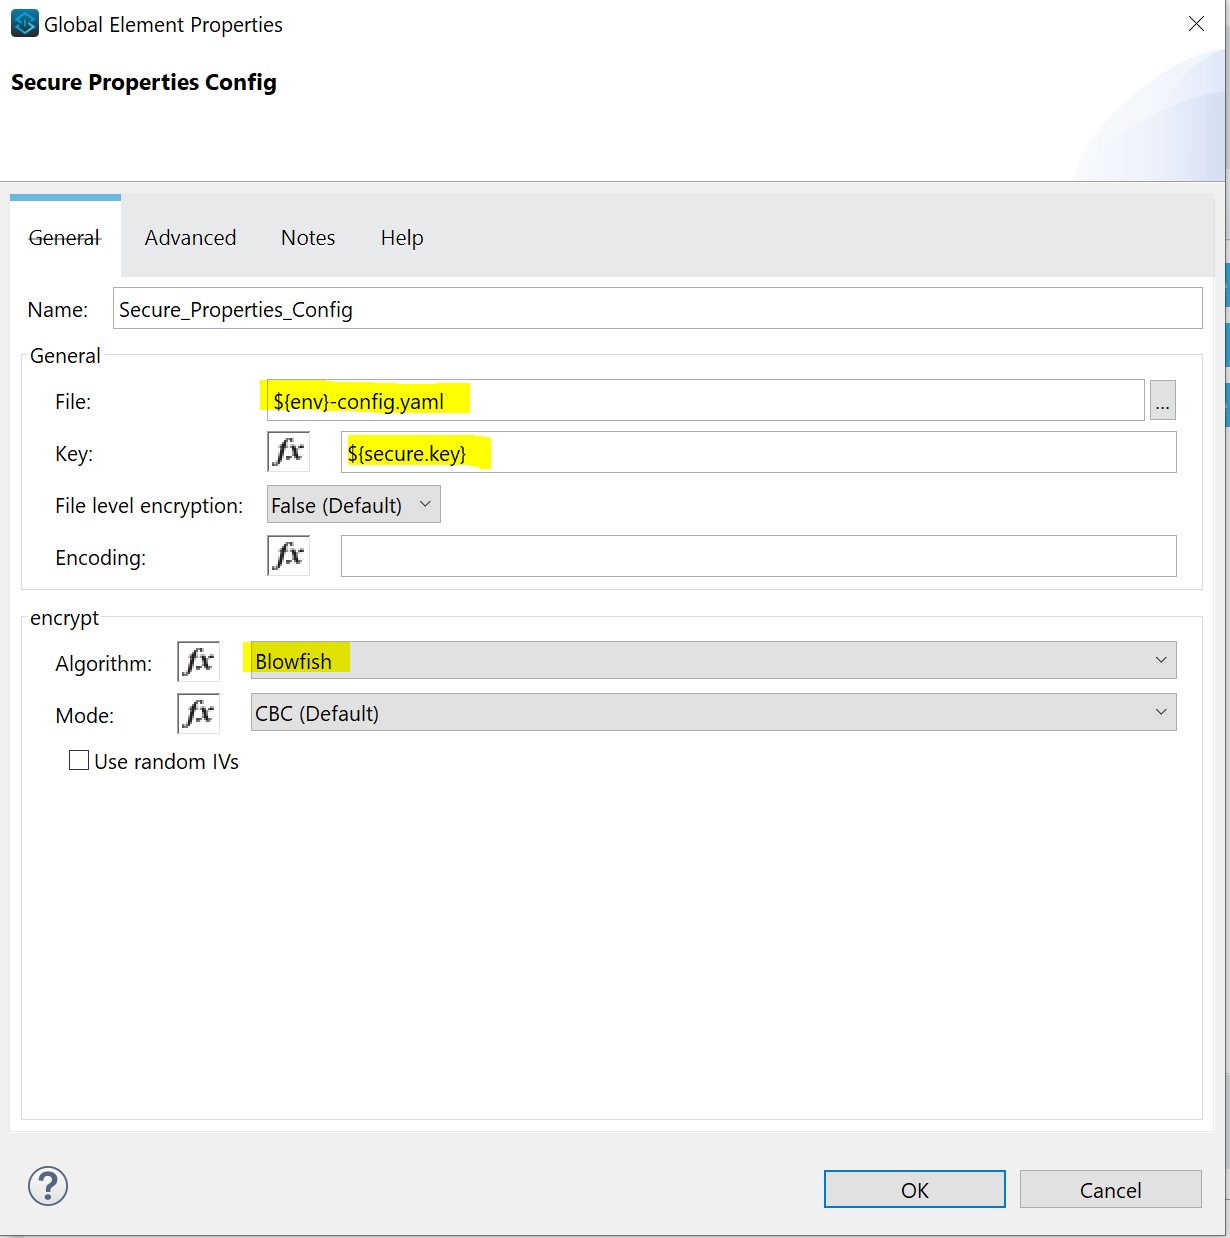
File is the configuration file with encrypted properties. We don’t specify the exact file name, but we use the global variable ${env} that we can populate during the deployment.
Key is the encryption key used to encrypt the property values. Again, we don’t specify the exact key, but now we use the global variable ${secure.key} that we can populate during the deployment.
Algorithm is the same as used for encryption of properties.
Click OK and proceed to next step.
STEP 5 – Include encrypted properties in the dev-config.yaml and reference it in DB config
The format to include encrypted property in yaml:
variable: “![encryptedstring]”
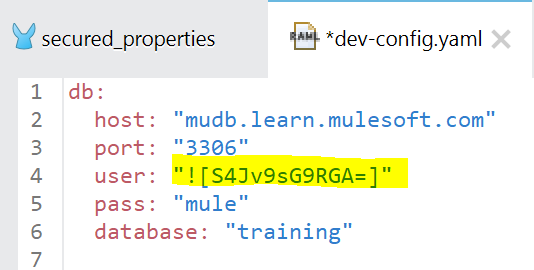
As you can see, for this exercise we encrypted “user” property.
The format to call encrypted property or property in general from secured property file.
${secure::variable}
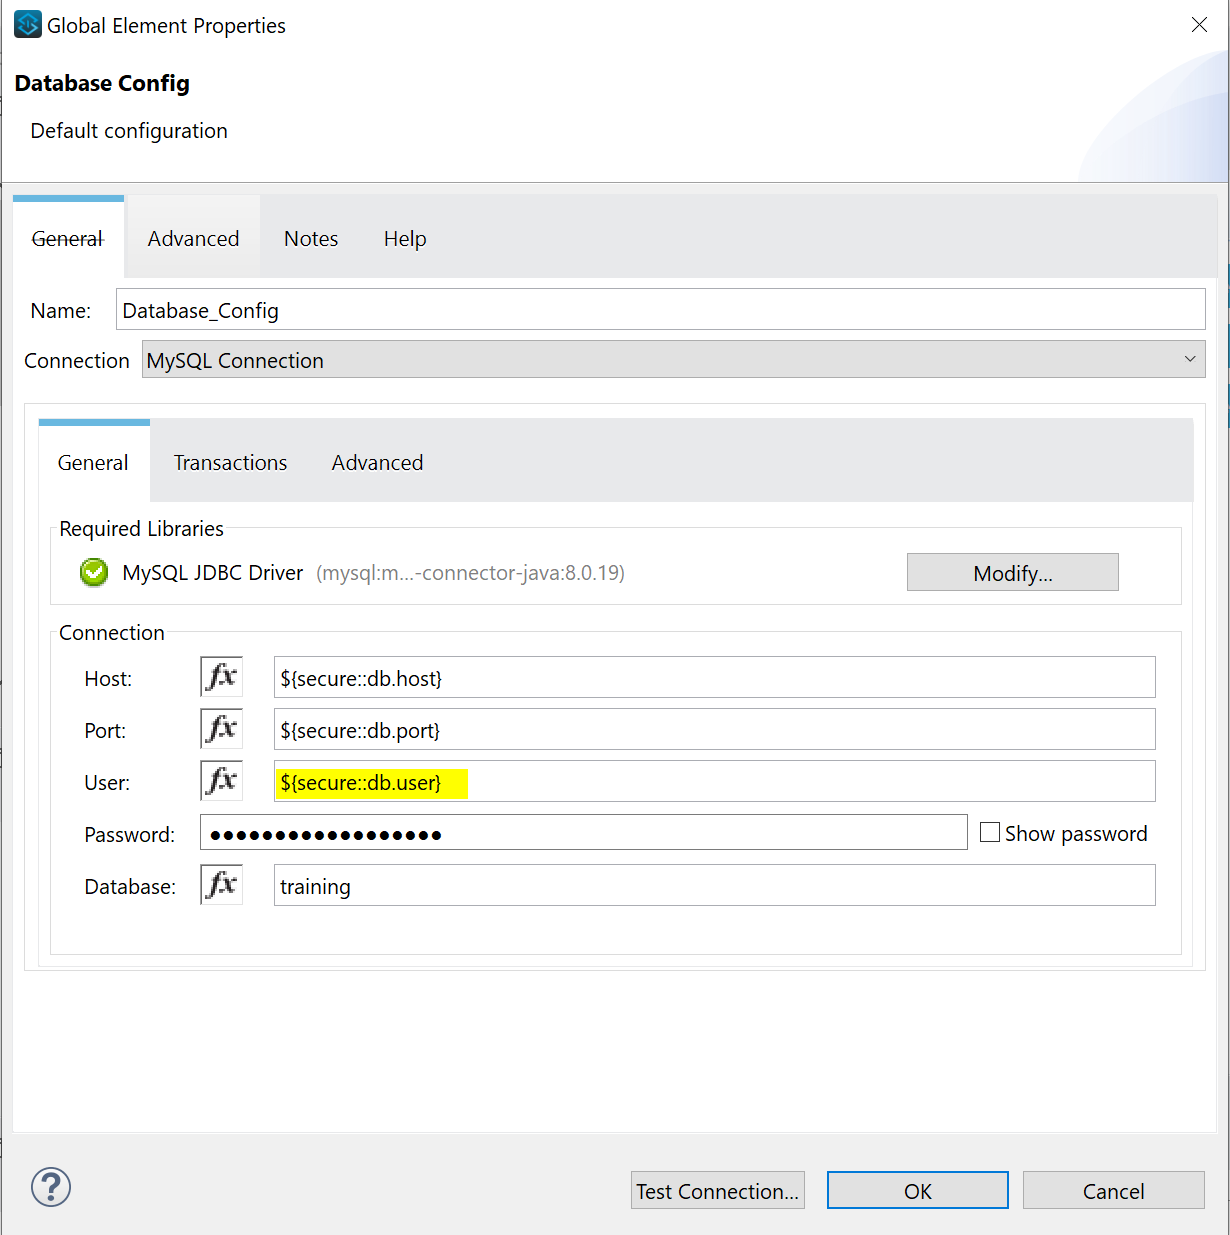
Notice how we reference even non-encrypted values with prefix “secure::”. This is because our configuration file is specified in Secured Properties under Global Elements.
If you are actually following this example and you are not able to make a DB connection to MuleSoft training DB, make sure you modify the MySQL Library to version 8.0.19. You can do that manually through Modify option in DB config as shown in the picture above.
STEP 6 – Create global variables and mask certain properties in Anypoint platform
First you have to navigate back to the Global Element in your main XML flow and click Create to add Global Property.
Global Property is nothing but a name/value pair and we will replace the value during the deployment. Add two Global Properties: env and secure.key. For value choose any temp value as you like, in my example I used: replaceMe for value.
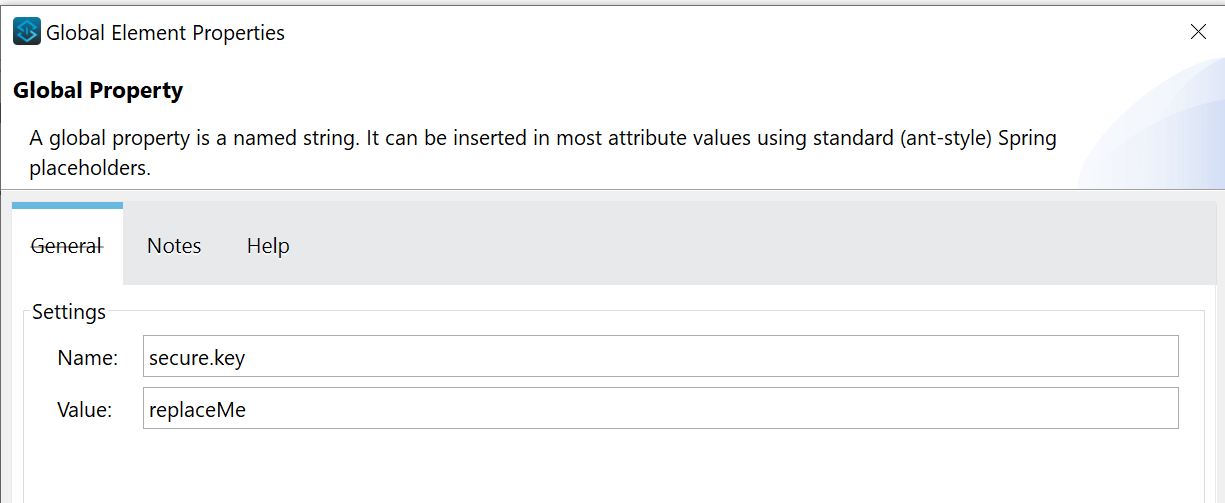
The purpose of these values is to be flexible to deploy our application to different environments by passing appropriate ${env} value and to supply encryption key ${secure.key} during the deployment, instead of storing it in the project.
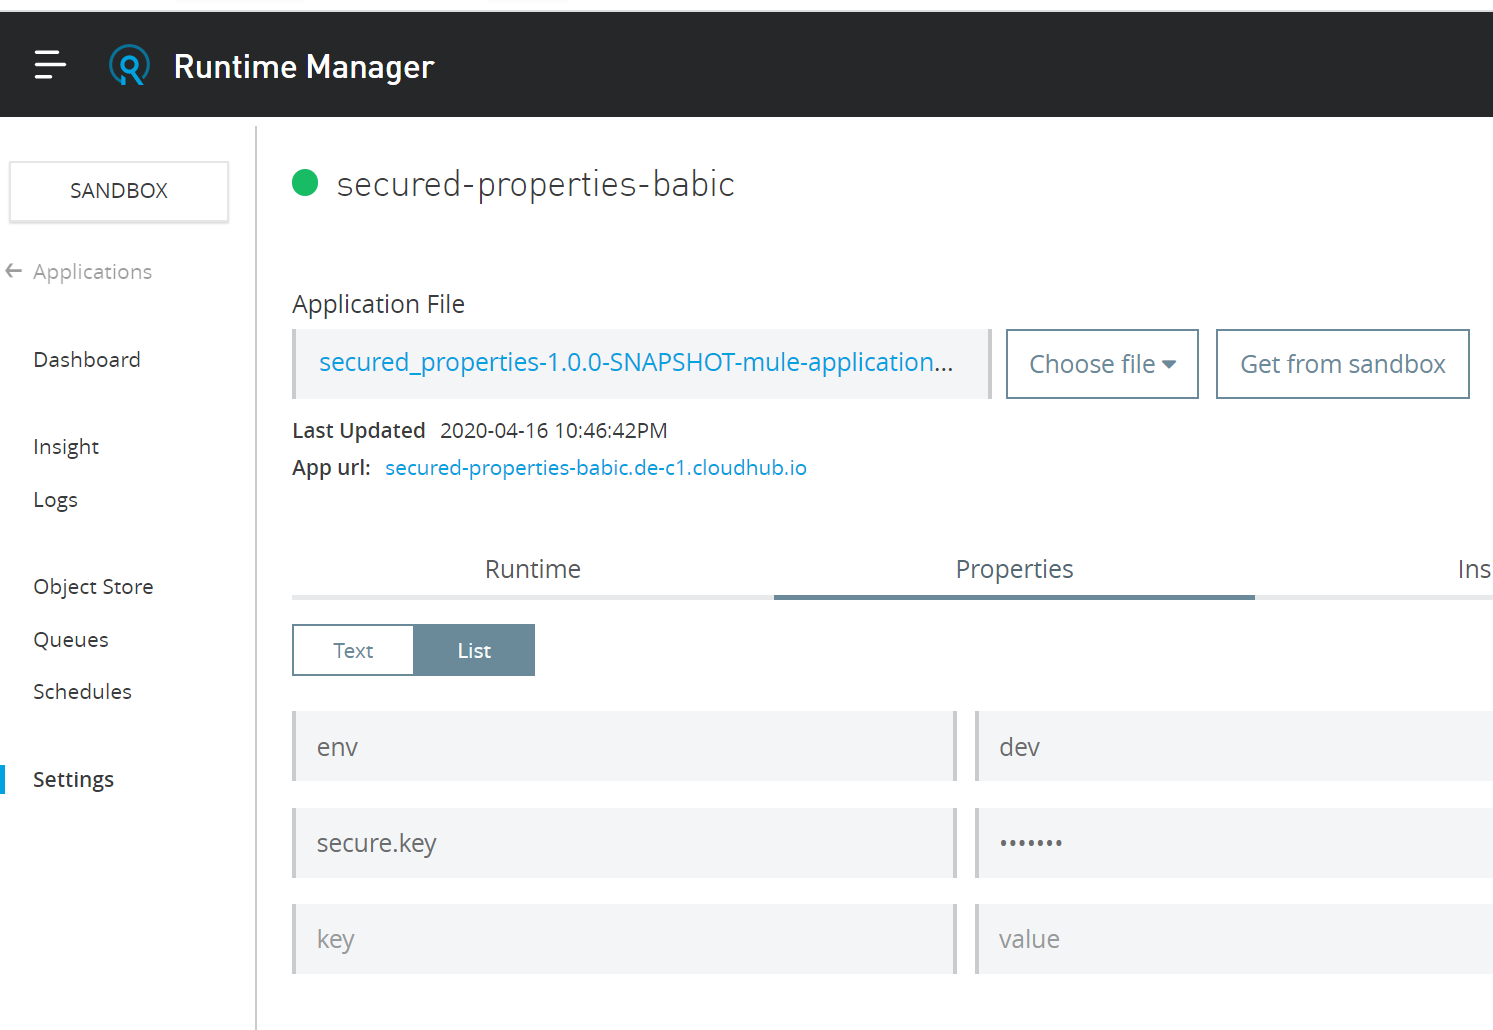
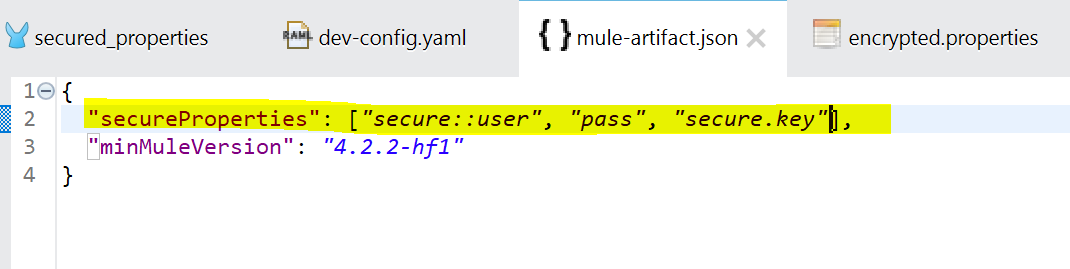
Now our project depends on these properties, but if we deploy it as such to Cloudhub, anyone with access to Runtime Manager and our application can easily go to Settings -> Properties and see the values we have passed during the deployment. In order to avoid that as well, we will configure secure.key property to be masked as in the picture below.
To achieve this we need to modify file mule-artifact.json file in our project root directory. We will add “secureProperties” element and comma separated list of properties we would like to mask in case that they are modified during the deployment. Since we don’t modify user or pass during the deployment, we don’t see those in picture above. However, secure.key will be modified during the deployment and its value is now hidden.
Now let’s continue to the final step!
STEP 7 – Deploying to local and Cloudhub
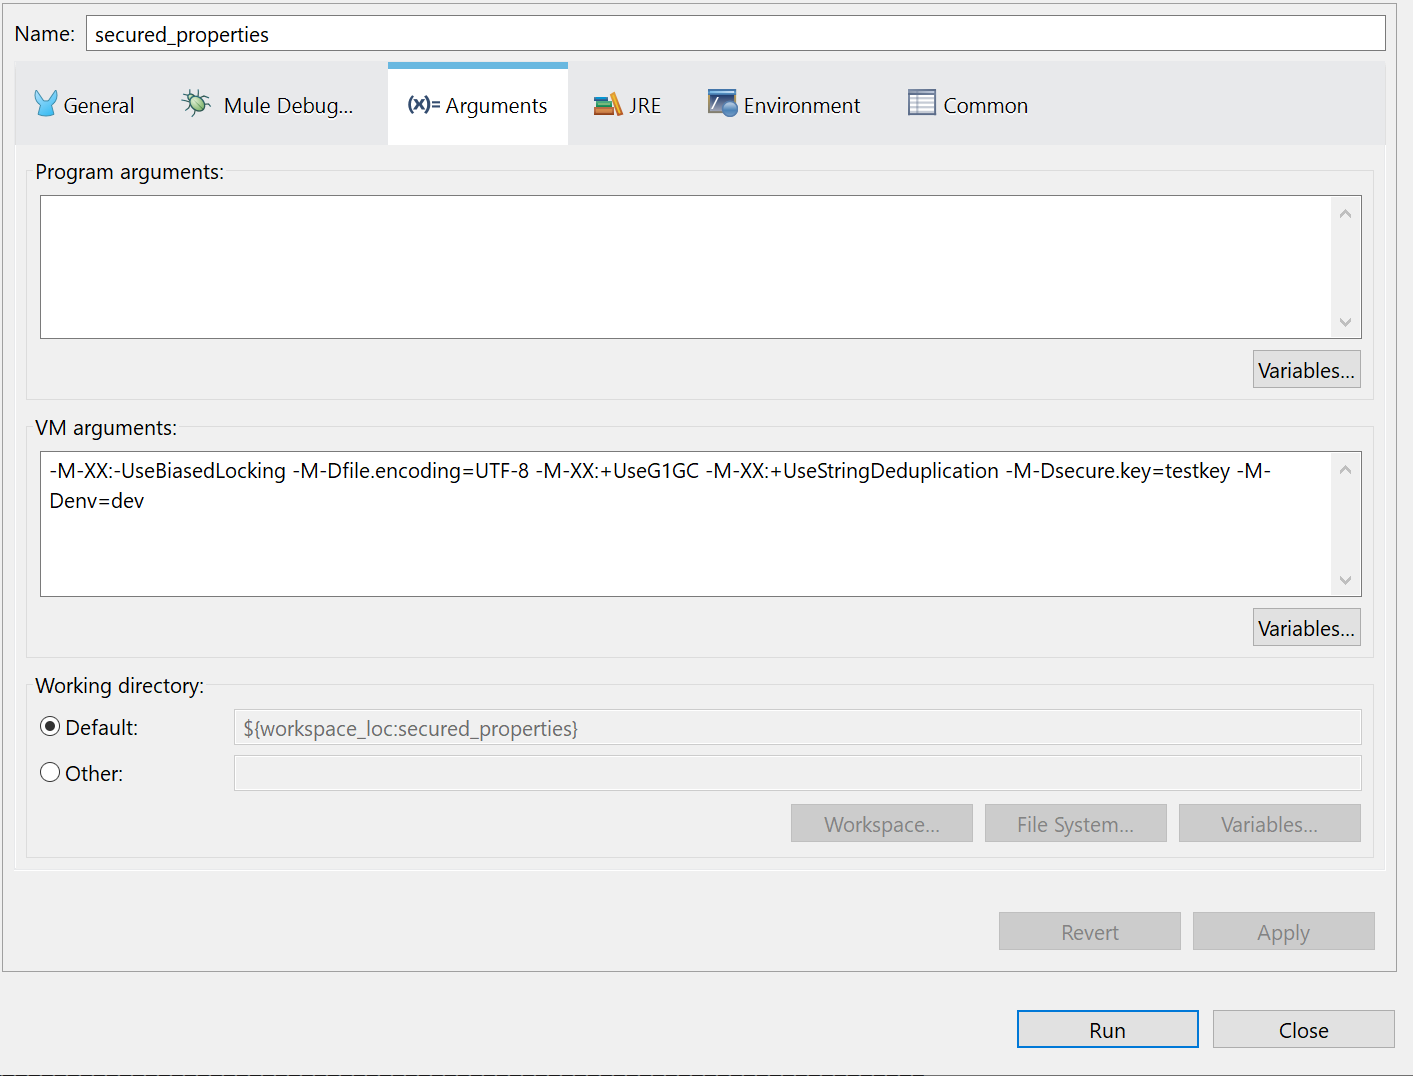
To deploy to local we use Anypoint Studio -> Run -> Run Configurations. In the Arguments section we will add values to our properties: -M-Dsecure.key=testkey -M-Denv=dev
To deploy to Cloudhub, we will use Anypoint Studio -> Right-Click on the Project -> Anypoint Platform -> Deploy to Cloudhub. Choose your environment in top left corner. Mine is Sandbox.
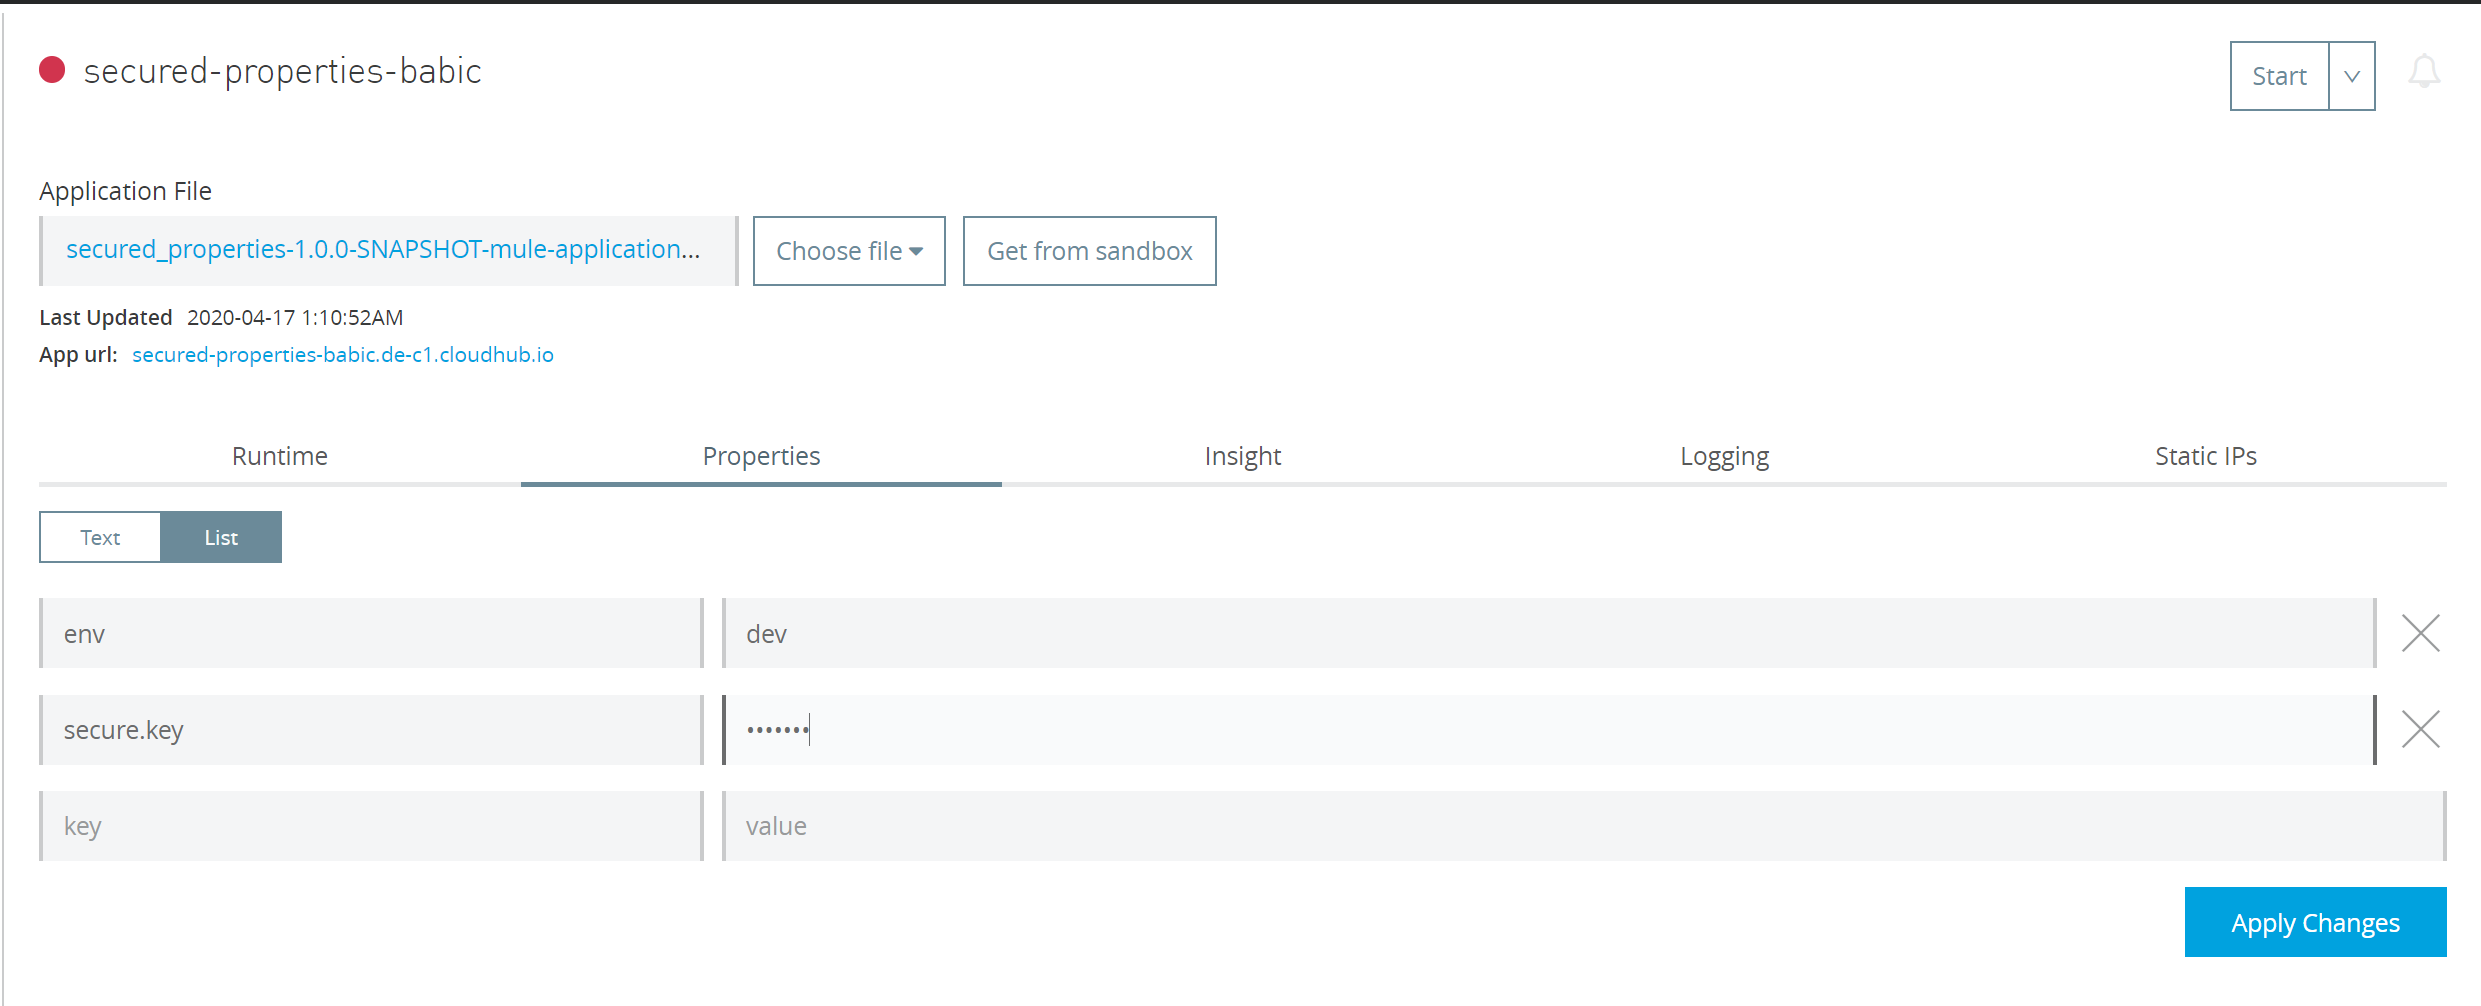
Go to Properties tab and add your properties. Click Deploy.

If you deploy your app without these properties, application will fail and you will need to enter these properties post deployment, apply changes and then Start the app from Runtime Manager. When you start typing value for secure.key property, it will be masked. The Application will now start properly.
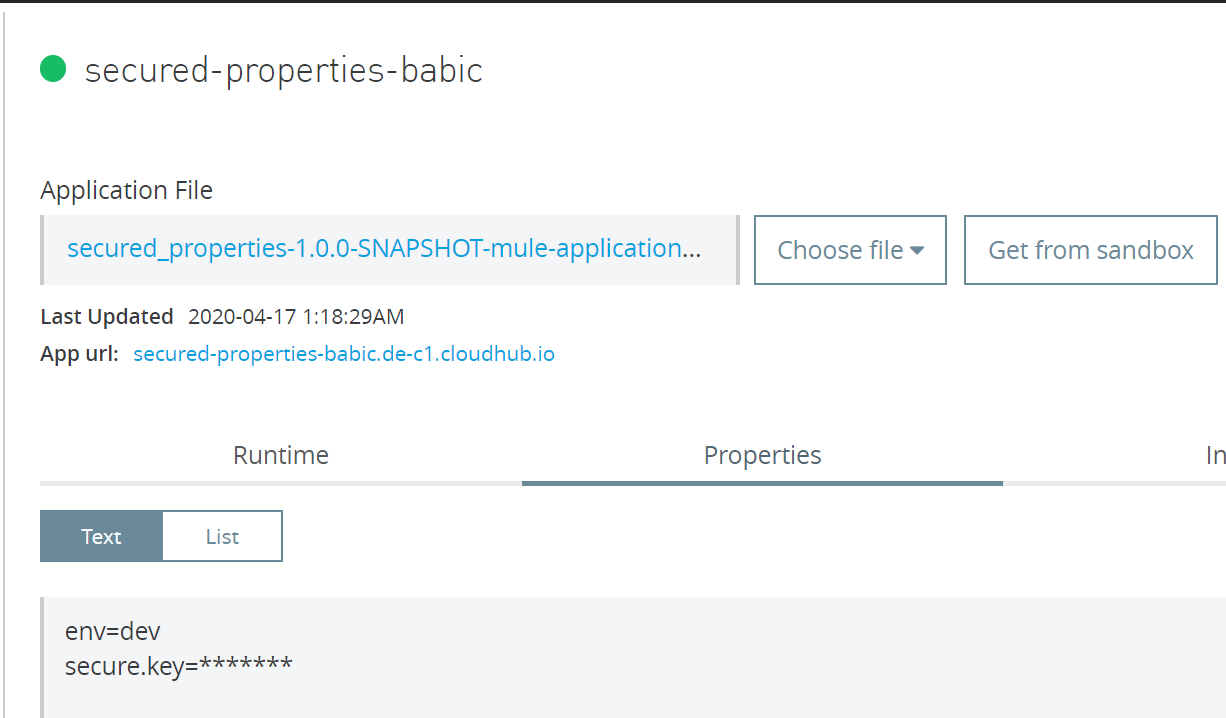
After adding secure.key my app is running:
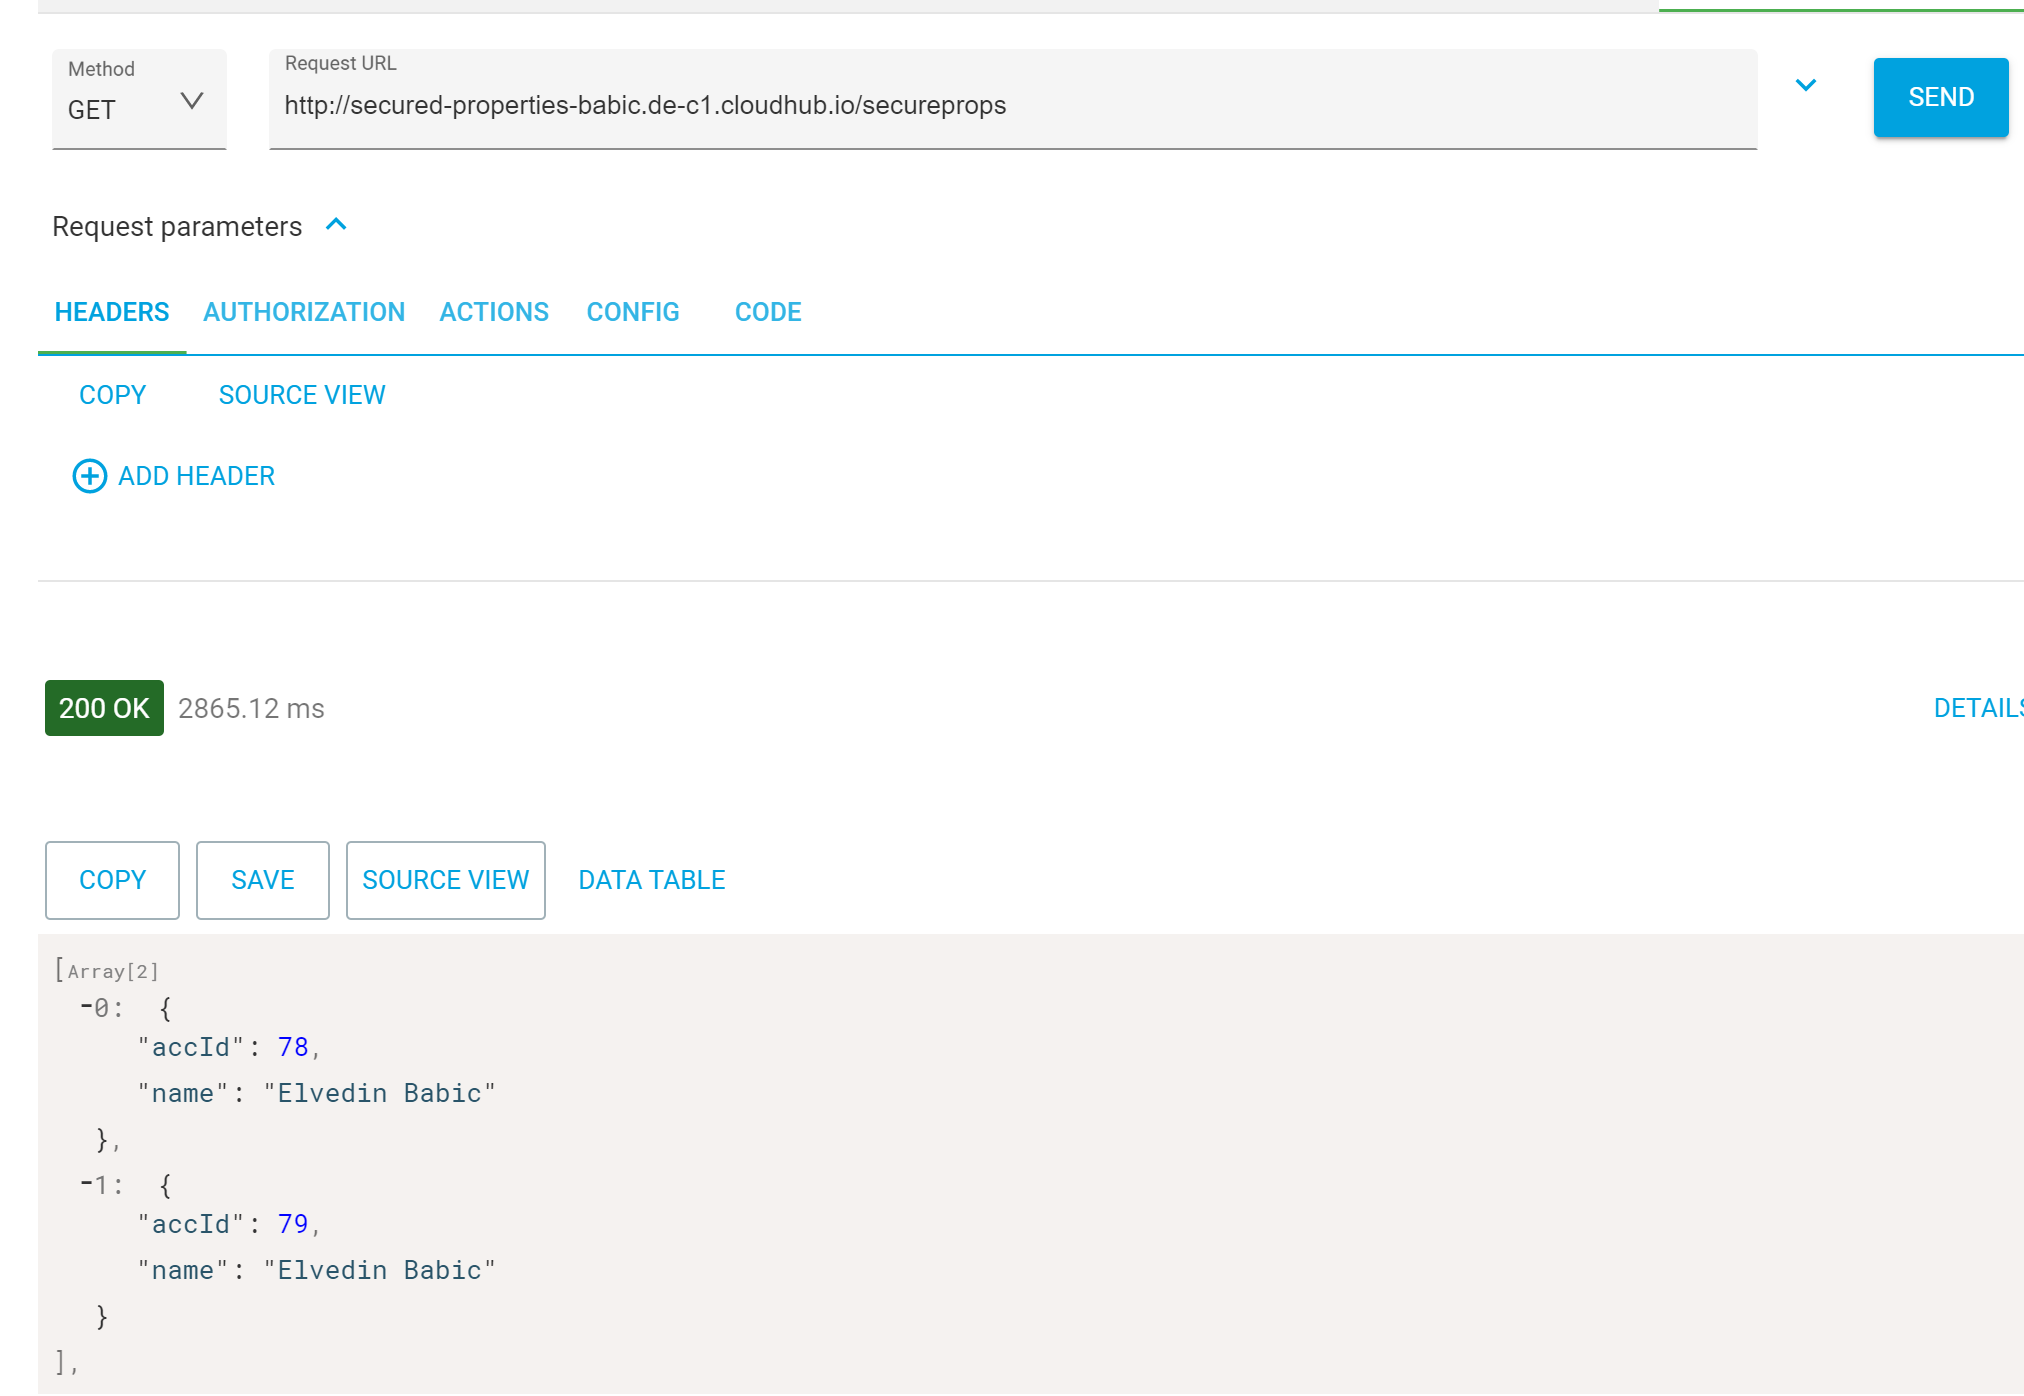
Final check, ensure that properties are resolved properly in runtime. I invoke HTTP listener endpoint from Advanced Rest Client and I see successful response with the data from database.
This is the end! I sincerely hope you found my instructions useful.
Do you have issues with Anypoint Studio or other MuleSoft solutions?
If you have any problems regarding MuleSoft solutions or other integration-related challenges, let us know! Send me an email via my contact details below or fill in our contact form.
Join our open & innovative culture
Open, accessible and ambitious are the keywords of our organizational culture. We encourage making mistakes, we strive to do better every day and love to have fun. Doing work you love with brilliant people is what it’s all about.

