In our practice, we tend to run into Spotfire projects that use Excel (or CSV) as a data source more and more. Of course our first question (and hopefully yours too) is: “Why not connect to a database?”. In many cases the answer is simple:
- There is no database that contains this data
- There is no budget to build a database for this purpose
- We cannot get direct access to the database
- We do not trust the data that comes directly from the database
- We first need to prove the concept
Fair enough, we try to make the best out of it. But after putting all data into Spotfire, trouble starts. We build a stunning set of dashboards and hence it has to be deployed to the community. And, of course, the community is not allowed to see everything!
In a database situation this security layer is easy to create, but in Excel? Per definition, the entire sheet ends up in your analysis, and there is nothing much you can do to prevent people from seeing all data, especially when they have the Full Client Analyst on their machine. So, it was time to use some best practices and some clear minds to tackle this issue.
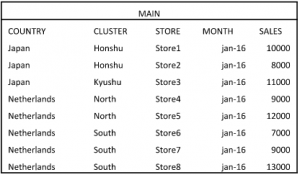
So, let’s get started! First of all, we made sure that we only have one data table to report on. Let’s call this table “MAIN”. Now, this table contains all data for the entire organization.

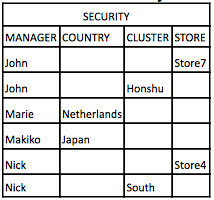
Now, we have managers that are allowed to see data on COUNTRY level, on CLUSTER level and/or on STORE level. So, as an example, a manager is allowed to see Store7 and Honshu. (Might be a weird example, but in other settings this is what we might come across). Hence, we have created a security table:

The next step is to pick up the LOGGEDIN USER in Spotfire. Which is very easy with a bit of Python Scripting:
username = Threading.Thread.CurrentPrincipal.Identity.Name
Document.Properties["username"] = username
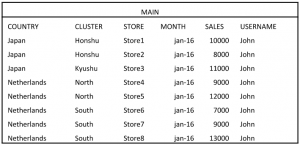
This snippet of script can be triggered by a button, but we’ll come to this later. So, now we have the Username in a Property. Let’s assume John has logged in. We created an extra column by means of a Transformation so that we can join on it, and we insert the value from the “username” property. Now, every row in MAIN gets the value of “John” in the new column USERNAME.
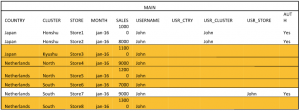
We have also loaded the SECURITY file, so now we can add a column to MAIN by joining with SECURITY. In this situation, we would need to do this three times; one for each level of security. Let’s have a look at just one, the rest is the same. We will join on USERNAME and COUNTRY and ignore all other columns, but when we do this we will add a new column by a transformation which will be filled again with the “username” property. If we do this three times for COUNTRY, CLUSTER and STORE, the result will be this:

Well, we are on our way! We have identified the rows John is allowed to see. For simplicity, we add a calculated column to see which lines are authorized:
In the same script we already started, we will select (or: mark) the lines with [AUTH] <> “Yes” and delete these lines. The leftovers are the lines that John is allowed to see.
So, are we done? Well… No. We need to make sure that John does not press the UNDO button and gets all his data back. And: we started off by saying that John needed to push a button to make this script work. – Or even better: a script which starts automatically. But how?
As I said earlier, we needed to use some best practices. Together with some colleagues in a large Oil&Gas company, we did a similar thing before. And it looks like this:
We started off with a start page that contains a button. This button sets off the script. Before users get this analysis, we change the Navigation Mode from Titled tabs to History arrows. When the button is pressed, the script is executed, rows are deleted and the navigation mode is reset to Titled Tabs. But still, a full client analyst user would be able to manually change the navigation mode and go into the full data set. So, we needed to run the script automatically, before a user can do anything. So…we put a label on this first page with a random value by a tiny piece of Java script on this same page:
Then, we added our script to this label and made it execute on change of the value. The script, in the end, navigates to the first valid page (away from the initial page with the randomizer) and deletes the initial page with the randomizer. So the sequence is now:
Start the DXP -> Opened in History Arrows -> Randomize and Execute -> View the limited data
Now, when John hits the UNDO button, we go back to “Randomize and Execute”. – And John will not be able to go back to the situation where all data is present!
And in the very end, we also added a property “runScript”. The Python script will only run if this value is “Yes”, giving us developers the possibility to have their own version that does not execute the script.
After these steps, I assumed the case was closed. Nevertheless, just after writing this I discussed this with two very bright colleagues in India. And, well yes: they found a tiny loop hole…! If your users are licensed to download a DXP from the server, save it to their hard drive and then open it; the scripts will be untrusted and will not run. Consequence: every data will be available to them. So, the last step is to prevent users from getting these rights.
So, security on Excel… It can be done, but it takes a bit of out-of- the-box thinking with some partners in crime!
More about our TIBCO Spotfire Knowledge
Want to learn more about Spotfire through our client use cases, handy how-to articles and blog-posts? Click the button below to discover our knowledge.


