NetCICD is a network automation framework developed from the start as a structured pipeline. It takes an industrial approach for network deployments, given the bulk nature of network changes.
In a series of blogs I take you through the steps required to get a NetCICD pipeline up and running using the NetCICD github repo and local instances of Gitlab, Jenkins, Ansible/AWX and VIRL on VMware Workstation.
In the second episode we prepared VIRL/CML, in the third we set up git.
This is the fourth in the series of blogs dedicated to get the NetCICD network automation pipeline up and running. In this episode we will prepare Jenkins. This is the last preparatory step.
Plugins
Jenkins is a basic system that can be enhanced with plugins. A number of plugins is required to get NetCICD to run. The following list contains the most important plugins (as installed in my system, some are installed as dependency):
- Ansible plugin
- Ansible Tower Plugin
- Apache HttpComponents Client 4.x API Plugin
- Authentication Tokens API Plugin
- Branch API Plugin
- Build Pipeline Plugin
- Build Timeout
- Command Agent Launcher Plugin
- Conditional BuildStep
- Credentials Binding Plugin
- Credentials Plugin
- Design Language
- Display URL API
- Durable Task Plugin
- Email Extension Plugin
- Favorite
- Folders Plugin
- Git client plugin
- Git plugin
- GIT server Plugin
- Gitlab Hook Plugin
- GitLab Logo Plugin
- GitLab Plugin
- jQuery plugin
- JUnit Plugin
- OWASP Markup Formatter Plugin
- PAM Authentication plugin
- Parameterized Trigger plugin
- Pipeline
- Pipeline Graph Analysis Plugin
- Pipeline Utility Steps
- Utility steps for pipeline jobs.
- Pipeline: API
- Plugin that defines Pipeline API.
- Pipeline: Basic Steps
- Pipeline: Build Step
- Pipeline: Declarative
- Pipeline: Declarative Agent API
- Pipeline: Declarative Extension Points API
- Pipeline: GitHub Groovy Libraries
- Pipeline: Groovy
- Pipeline: Input Step
- Pipeline: Job
- Pipeline: Milestone Step
- Pipeline: Model API
- Pipeline: Multibranch
- Pipeline: Nodes and Processes
- Pipeline: REST API Plugin
- Pipeline: SCM Step
- Pipeline: Shared Groovy Libraries
- Pipeline: Stage Step
- Pipeline: Stage Tags Metadata
- Pipeline: Stage View Plugin
- Pipeline: Step API
- Pipeline: Supporting APIs
- Plain Credentials Plugin
- Resource Disposer Plugin
- Run Condition Plugin
- SCM API Plugin
- Script Security Plugin
- Server Sent Events (SSE) Gateway Plugin
- SSH Credentials Plugin
- SSH Slaves plugin
- Structs Plugin
- Timestamper
- Token Macro Plugin
- Workspace Cleanup Plugin
You can install credentials under Manage Jenkins -> Manage Plugins.
Credentials
In order for the branches to run successfully, you’ll need credentials. In order to prevent credentials inclusion in the Jenkinsfile, all credentials are stored in the Jenkins credential store. They are encrypted with the jenkins instance ID, which makes stealing the credential store useless.
The following credentials are required: Jenkins-CRED, CML-URL and CML-SIM-CRED.
Jenkins-CRED
First of all you need to be able to link an agent in Jenkins remotely. You need credentials for this. These are normal username/password credentials:
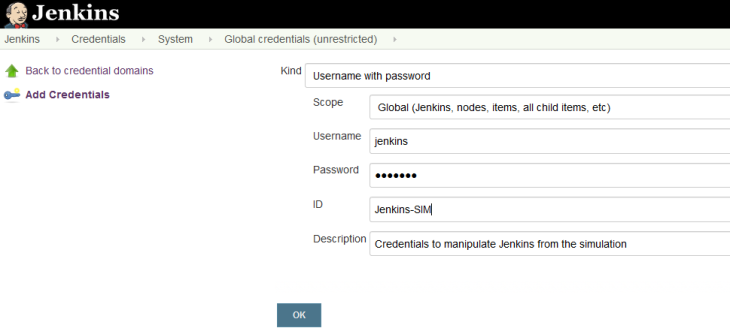
For this to work, the security settings in Jenkins need to be set to: “Logged in users can do anything”.

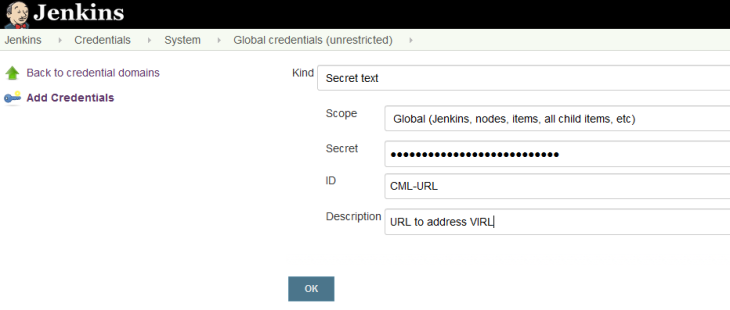
CML-URL
The next credential you need is the CML-URL, in my case: “http://192.168.32.148:19399”. This needs to be entered as a secret text credential:
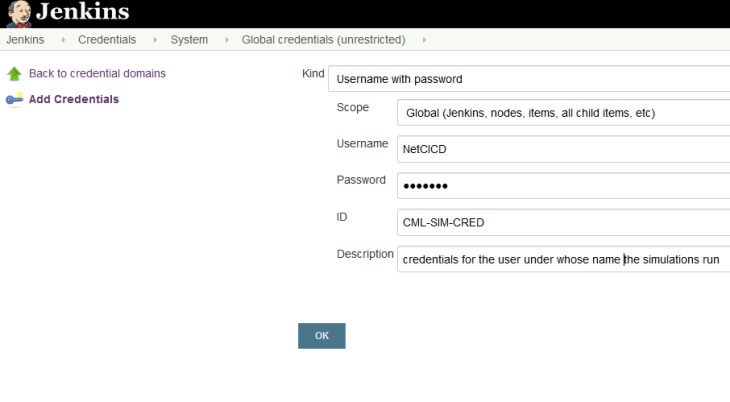
CML-SIM-CRED Sluiten
These are the credentials of the user as which the simulations are run. They are regular credentials (username/password). If you use VIRL, use guest/guest, for CML use the specific credentials you set up for the NetCICD simulation.
Agents
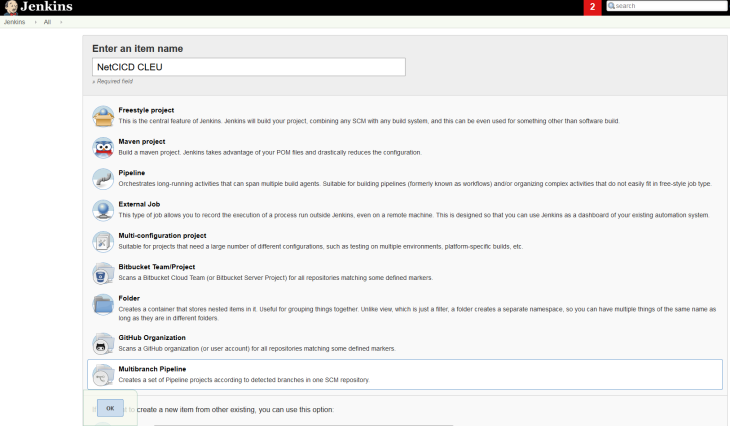
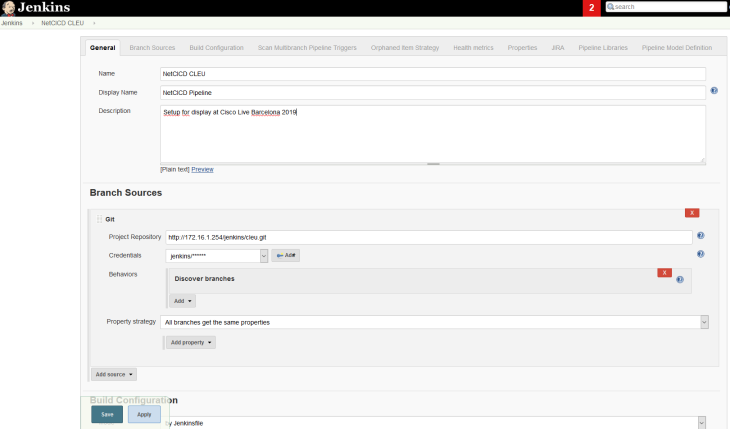
The last step is to create a multi-branch pipeline. This will track the repository automatically, no web-hooks required.
Next we need to configure the project:
As soon as the project is created in git and files are in the repository, you’ll see the master branch in the Jenkins overview:
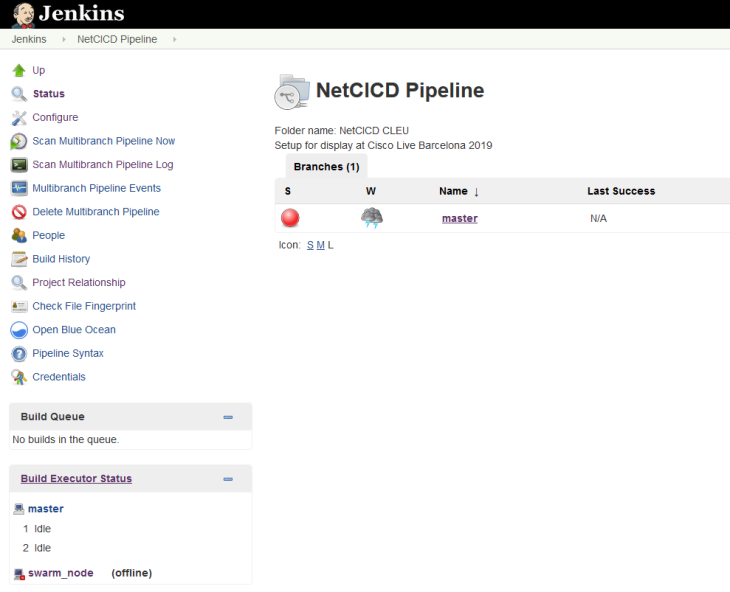
If all goes well, it will run immediately and you can see if it is successful.
You may want to add “Scan Multibranch Pipeline Triggers” and set the scan periodically to 1 minute.
Next
In the next blog, we’ll dive into using NetCICD.

