Step by step with IBM MQ Messsaging Solution
The increased trend in Digitalization results in creation of complex interconnected applications ecosystem. While there is a common understanding of the need to connect systems with different natures together using preferably a mature integration platform, it is also very common to integrate different integration platforms together, where each platform has it’s own messaging provider. In this article I will describe my experience in connecting TIBCO BusinessWorks (BW6) with IBM MQ Messaging Solution (IBM MQ) as a messaging provider and you will find an easy step by step configuration guide enabling IBM MQ as native messaging provider for TIBCO BW6.

What is Tibco BW6?
TIBCO BW6 as an enterprise integration solution is required to connect with different messaging systems. IBM MQ is a widely popular messaging solution. TIBCO BW6 has out-of-box capability to integrate with IBM MQ, but there is no simple step by step configuration guide to describe how to connect TIBCO BW6 with IBM MQ.
What is IBM MQ?
“IBM MQ is a family of network software products that IBM launched for the first time as an IBM product in December 1993. It was originally called MQSeries, and was renamed WebSphere MQ in 2002 to join the suite of WebSphere products. In April 2014, it was renamed IBM MQ.” (Wikipedia)
IBM MQ, often referred to as “MQ”, is IBM’s Messaging solution for Enterprise and IBM’s Message Oriented Middleware offering. It allows independent and potentially non-concurrent applications on a distributed system to securely communicate with each other. MQ is available on a large number of platforms (both IBM and non-IBM), including z/OS (mainframe), OS/400 (IBM System i or AS/400), Transaction Processing Facility, UNIX (AIX, HP-UX, Solaris), HP NonStop, OpenVMS, Linux, OS 2200, and Microsoft Windows.”
The software used for this exercise
The environment was built using these software packages:
- IBM MQ version ™ 7.5 (trial version)
- TIBCO ActiveMatrix BusinessWorks ™ 6.4.1
Step by step configuration guide
After installing TIBCO BW6 the following steps need to be executed:
1. Configure TIBCO BW6 with EMS:
- Go to TIBCO_HOMEbw6.4bin
- Run the following command “bwinstall ems-driver”
- Provide the location for TIBCO ems plugin when prompted
- Verify you got a success message
2. Configure TIBCO BW6 with IBM MQ
- Copy the following jar files “com.ibm.mq.headers.jar, com.ibm.mq.jar, com.ibm.mq.jmqi.jar, com.ibm.mqjms.jar, dhbcore.jar, fscontext.jar, jndi.jar, ldap.jar, providerutil.jar” to <BW6_HOME>bw6.3configdriversshellsjms.IBM MQ.runtimeruntimepluginscom.tibco.bw.sharedresource.jms.runtime.IBM MQ.clientlib
- Go to TIBCO_HOMEbw6.4bin
- Run the following command “bwinstall IBM MQ-driver”
Your BW6 installation is now ready to consume messages from IBM MQ. The following activities will be done on IBM side and will require administration rights for IBM MQ:
- Run IBM WebSphere MQ explorer
- Create a new Queue Manager “MyQM”
- Create the required destinations queues or topics by selecting the right resource folder from the panel

- Create a channel by selecting the channels folder and select New > Server-connection Channel

After the channel created, you need to manage the channel authentication which can be done using the command line tool or using the GUI from MQ explorer. I will explain the GUI method. The command line is fully described in the documentation:
-
- Under channel folder > point to the sub-folder “Channel Authentication Records” and right click to select new Channel Authentication Record where a wizard will start to create the required authentication
- Manage the authentication by allowing or blocking specific user from accessing your MQ manger, here you will define a rule for allowed users (tab 1). Click next
Note: at tab 2 you will be presented with 4 different options to authenticate your client. In this example I am using the client application user id
-
- Select Client application user id and click next
- Type the channel name which has been created on the previous step and then click show matching channels
- Select the required channel and click next
Note: You will be asked to add the remote client user id. This user will be used by TIBCO BW6 installation and it will be the login user. For each machine that needs to communicate to the MQ Manager a new user must be added. Some extra measures could also be taken for authentication eg: filter by ip address
-
- Type the remote client user id and click next
Note: You will be asked to provide the authorized user who will be used internally to map your remote client user to local authenticated user
-
- Type in the local authenticated user and click next
- Type in the optional description of this rule and click finish
Now you configured a channel to connect to your queue manager. The next step is to create a JMS Administrated Object which will provide you with a binding file to be used by TIBCO BW6 to connect to your JMS destinations:
- Go to IBM WebSphere MQ explorer
- Point to the folder JMS Administrated Objects and right click
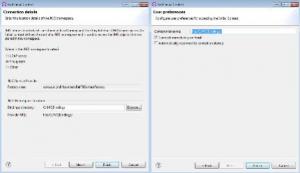
- Select Add Initial Context, a new wizard will start
- Step 1, select File system to be your JNDI namespace location and choose a folder to store your .binding file then click next
- Step 2, verify the context nickname and change it if needed. Also verify that Connect immediately is checked on finish. You can also check the Automatic reconnect on startup
Now you have your JMS administrated object created, you need to create Connection factories and point to your local destinations:
- Click the context folder created in the previous step. Two sub folders should be found inside the initial context folder
- Point to connection factories subfolder and right click. Select new > connection factory from the menu
- Give it a name and keep the messaging provider at WebSphere MQ. Click next
- Choose the type to be a QueueConnectionFactory and click next
- Change the transport to be a MQ Client
- Double click the newly created connection factory and change the following
- In the Connection tab: Select the base queue manager to be your MQ Manger which you created earlier. Type in the hostname or Ip address of the IBM MQ installation and the port where MQ Manger is listening in the Connection list input box
- In the channel tab: Choose the channel you created earlier in this guide.
- Keep the rest as default. You may read more about other options from the documentations as they are involved in more advanced options which is not part of this guide
- Repeat the previous steps to create a topic connection factory
- Verify you got a new .binding file in the folder you choosed when creating the initial context and copy the URL for the file
- Copy the .bindings file to the remote computer and place it in a folder of your choice
- Modify the URL to point to the new folder where the .binding is placed
After completing the previous steps you are almost done. You will need also to configure the resources in TIBCO BW6 to point to the .bindings file which will be described in the last part of this guide.
Now, IBM MQ is ready to integrate with TIBCO, follow this last part to set up your TIBCO platform to use IBM MQ as a messaging provider:
- Open TIBCO BW6 studio for designer
- Create a new workspace or use an existing one if you feel more comfortable
- Create a new BW project
- Add a new JNDI configuration resource
- Choose the JNDI provider “IBM WebSphere MQ”
- Verify the Initial Context factory is selected as “com.sun.jndi.fscontext.RefFSContextFactory”
- Point provider URL to the folder where the .bindings is placed. It should look something similar to “file:/C:/TIBJNDI”
- Add new jms connection resource
- Choose the Connection Factory Type to be JNDI
- Set Messaging Style to Queue/Topic
- Set Queue Connection Factory to “<Name of Queue Connection Factory>” which you choosed when creating the connection factory while defining the initial context in MQ JMS administrated objects
- Set Topic Connection Factory is the “<Name of Topic Connection Factory>” which you choosed when creating the connection factory while defining the initial context in MQ JMS administrated objects
- Point the JNDI configuration to the JNDI configuration created earlier in this chapter
- Click on the link “Click here to set preferences”
- In the new open dialog point BusinessWork > palettes > JMS for directory preference, point to the folder which contains the IBM MQ jar files used to during the bwinstall step in the beginning of this guide
- Save the project and click test connection to get a green message says you are successfully connected to IBM WebSphere MQ JMS Provider

Finally, you reached the green success message. Congratulations! You can now use IBM MQ as a native messages provider for TIBCO platform.
If you didn’t reached the green success message, you will get a descriptive message which could explain the actual reason why you are not able to connect. The logs in both sides TIBCO and IBM MQ will give you enough information about the root cause.
Check with IBM MQ administrator to verify the authentication between IBM installation and TIBCO.
Check with the network administrator to verify the connectivity and ports are open.
Good luck further with your integration projects!
Devoteam: the #1 partner when it comes to Tibco BusinessWorks
Due to our background in Integration and DevOps, we are the #1 partner for well-known Dutch organizations when it comes to Tibco BusinessWorks. Curious to learn more? Read all of our success stories, use cases, and technical blog-posts.

