As Devoteam, we were challenged to create a data warehouse on Google Cloud Platform (GCP). I used the infrastructure-as-code approach for the creation of the infrastructure, the advantage being the opportunity to recreate the full environment with exactly the same names and settings for development, testing and production. The code was written and deployed to create all infrastructure with Terraform.
In this blog, I will guide you through the code that I created. If you follow all the steps, you will be able to create cloud storage buckets, including a folder structure, some datasets and a Cloud Composer environment. You will also gain general knowledge about Terraform, which enables you to create additional resources as well.
Step 1: Preparations
- The first step is to download and install Terraform. You can download Terraform right here.
- Next to Terraform, we need a GCP project that we can fill using Terraform. From now on I will assume that the name of the GCP project is ‘devoteam_development’.
- Last but not least, we need folders and sub folders to save and structure the Terraform code files. Let’s create the following folders:
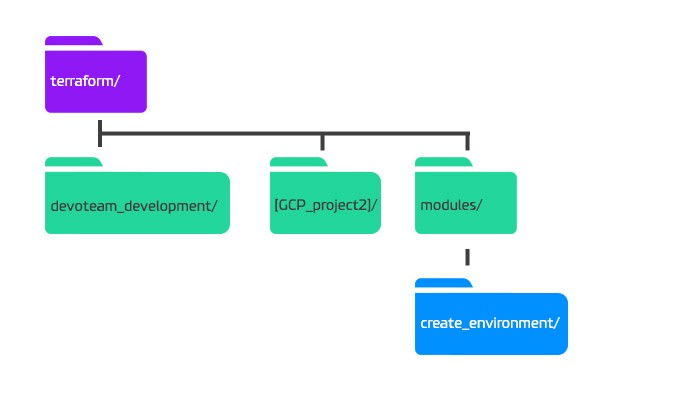
Step 2: Creating a Terraform file for the development environment
For each environment you need to have a folder containing its own Terraform main.tf file. This file needs to be as small as possible, because you need to recreate it for every project you have. I created a main.tf file in the devoteam_development folder that only contains two blocks of code.
The first block tells Terraform where to store/find the terraform.tfstate file and the second block calls a module that creates all the infrastructure.
If you do not specify the storage place of the terraform.tfstate file, Terraform will create the state file locally on you computer, but this is not recommended.
terraform {
backend "gcs" {
bucket = "terraform_devoteam_development"
path = "terraform.tfstate"
project = "devoteam_development"
}
}
This block of code defines that the state file is stored in the bucket ‘terraform_devoteam_development’, in the file ‘terraform.tfstate’ and in the project with project id ‘devoteam_development’ within GCP. Note that you need the project id, and not the project name.
The Terraform bucket needs to exist before Terraform can store a file in there. I created this bucket manually. This will be the only bucket you need to create manually, because after the creation of this single bucket, Terraform will take care of the rest.
The second block calls a module that creates all the infrastructure. We specify only the variable project. All the other variables we will see in the following steps have default values, so we do not need to specify these if we want to use the default values.
module "full_environment" {
source = "../modules/create_environment"
project = "devoteam_development"
}
The module block is a code block that refers to another Terraform project. The source parameter contains the path to the folder containing this project.
For the production environment, you just need to create a new file with the two code blocks of described in this section. You only have to change the hard coded variable project from ‘devoteam_development’ to ‘devoteam_production’ three times.
Step 3: Creating the module for all the infrastructure
The actual creation of the infrastructure is done through the use of a module. Because you call the same module for all the different environments, all the environments have the same infrastructure. The module contains of a folder with the module name, and two Terraform files. The main.tf file contains all the commands, and the variables.tf file defines all the variables that are used in the commands.
Main.tf
In the main file of this module we specify that we will be creating the infrastructure in Google Cloud.
provider “google” {
version = “~> 1.19”
project = “${var.project}”
region = “${var.region}”
}
The value and region of the project come from variables. These variables are defined in the variables file and have the structure ${var.[variable_name]}.
Variables.tf
The variables.tf file defines all the general variables and lists of all the resources that need to be created. In our case we define three general variables: the project id, the region where the data storage buckets will be created and the location where the datasets will be stored.
variable "project" {
description = "The name of the Google Cloud Project."
}

variable "region" {
description = "The region in with the buckets are located."
default = "europe-west4"
}

variable "location" {
description = "The location of the dataset."
default = "EU"
}
Note that the variable project does not have a default value, where the region and location has.
This implies that when we call the module create_environment, the project name needs to be specified, where the region and location only needs to specified if you want to store the data in a different region than the default value.
Run Terraform Code
With these files created, we can initiate and run the Terraform code. It will not create infrastructure yet, but that will come in the next steps. To get Terraform up and running, we need to run some terminal commands.
1. First we need to authenticate ourselves, so that Terraform gets access to GCP.
gcloud auth application-default login
This command opens a web page where you can log in to authenticate. You can log in with a Google account that has editing access to the created GCP project.
2. Change the directory to the development folder.
cd terraform/devoteam_development
You will always run the Terraform commands from the folder containing the root main.tf file.
3. Now we need to initiate Terraform.
terraform init -backend=true

-backend-config="bucket=terraform_devoteam_development"

-backend-config="project=devoteam_development"

-backend-config="path=terraform.tfstate"
If you used other names for the bucket, GCP project or the state file, you need to change the code.
4. We can now apply the Terraform files with the command.
terraform apply
This command actually applies the Terraform code and creates all the resources that are defined in the code.
When you created a second environment e.g. production, you need to rerun the last 3 commands.
Step 4: Creating buckets
The Cloud Storage in GCP uses buckets. In these buckets you can have folders and files. We define the names of the buckets in the variables.tf file:
locals {
bucket1 = "bucket1_${var.project}"
bucket2 = "bucket2_${var.project}"
}
The names of the buckets are stored in a locals block. In Terraform you can not interpolate one variable in the default of another variable, because the order in which all the variable blocks are processed is not predefined. A local however can interpolate variables.
A local is placed in a locals block. There can be more than just one local in one block, and there can be several locals blocks. We include the project name in the name of the bucket because the bucket names need to be globally unique in GCP. For more information about locals, click here.
Now we have defined the unique names, we can add resource blocks in the main.tf file to create the buckets.
resource "google_storage_bucket" "bucket1" {
name = "${local.bucket1}"
location = "${var.region}"
storage_class = "REGIONAL"
}

resource "google_storage_bucket" "bucket2" {
name = "${local.bucket2}"
location = "${var.region}"
storage_class = "REGIONAL"
}
A resource block in Terraform starts with the command resource. Then it defines the resource type – in this case a Google Storage Bucket – after which it gives the name of the resource as it is known by Terraform itself. All the needed parameters are given between the accolades. The name of the bucket in GCP is the interpolation of a local variable. Note that the name of the bucket can be different from the name that is used in Terraform to refer to the resource. The Terraform name is only for Terraform itself.
You can now rerun the terraform apply command where you will see that Terraform wants to create two buckets.
Step 5: Creating folders
Now that we have created the buckets, we can start to fill it with a map structure. We create a variable list with the names of the (sub) folders in the variables.tf file.
variable "Names_of_folders_in_bucket1" {
description = "A list of all the names of all the (sub) folders in bucket1. Use the format [mean folder]/[sub folder]/, with the different folders separated with a comma."

default = [
"inbox/",
"inbox/subfolder/",
"outbox/",
]
}
The default value is a list, and if you want to create more folders, you can simply add elements to this list. All the elements end with a slash to tell GCP that we want to create folders and not files. For the creation of these folders, we want to loop over the elements in the list. For this we use the count parameter in the resource block. We add this code to main.tf.
resource "google_storage_bucket_object" "folders_bucket1" {
count = "${length(var.Names_of_folders_in_bucket1)}"
name = "${element(var.Names_of_folders_in_bucket1, count.index)}"
content = "${element(var.Names_of_folders_in_bucket1, count.index)}"
Bucket = "${google_storage_bucket.bucket1.name}"
}
The length function is used to create the right number of objects in the bucket. With the element function we get the element of the list corresponding to the current index of the count loop. The name of the bucket object is the same as the content. If we want to create a file, we can define a different content. We do not use the local for the bucket name, as we used earlier. Terraform does not follow the code line by line, but executes all the resource blocks parallel. This gives Terraform several advantages, but also implies that it can happen that it tries to create the folders before the bucket is created. To prevent this, Terraform tries to determine if there are dependencies, to create them in the right order. It checks the dependencies by looking if the parameters contain interpolations to other resources. In this case there is an interpolation of the name of bucket bucket1 from the resource type google_storage_bucket, so this bucket needs to be created first.
The creation of folders in the second bucket can be done in a similar way.
Step 6: Creating BigQuery Datasets
For the creation of the BigQuery datasets, we do something similar to the creation of the folders. I do not only want to set a dataset ID, but also a description. To do this, you can create two lists, one with the dataset ID and one with the description. This makes is hard to see what ID corresponds with which description. I just made one large list with the dataset ID’s and the descriptions alternating.
variable "dataset_id_with_description" {
description = "A list of all the dataset ID's and there description."

default = [
"dataset1",
"The first dataset.",
"dataset2",
"The second dataset.",
]
}
For the creation of the datasets we have to adjust the indexes to deal with the descriptions.
resource "google_bigquery_dataset" "datasets" {
count = "${length(var.dataset_id_with_description) / 2}"
dataset_id = "${element(var.dataset_id_with_description, count.index * 2)}"
description = "${element(var.dataset_id_with_description, count.index * 2 + 1)}"
location = "${var.location}"
}
You can do some simple calculations in Terraform. We divided the length of the list by two, because all datasets have an ID and a description. The index starts with zero, so for the the IDs we need the even indexes starting with zero, and for the descriptions the odd ones.
Step 7: Creating a Cloud Composer Environment
The creation of a Cloud Composer environment needs quite some parameters. To structure all the parameters we created a local map. A map is similar to a list, but with key value pairs.
locals {
cloud_composer = {
name = "cloud-composer-${var.project}"
region = "europe-west1"
node_count = 3
zone = "europe-west1-b"
machine_type = "n1-standard-1"
}
}
Again we used a locals block, because we want to interpolate a variable in the name. The name of the Cloud Composer environment needs to be globally unique (similar to the buckets). In the main.tf file we can now create a Cloud Composer environment with the right parameters.
resource "google_composer_environment" "cloud-composer" {
name = "${local.cloud_composer["name"]}"
region = "${local.cloud_composer["region"]}"
config {
node_count = "${local.cloud_composer["node_count"]}"

node_config {
zone = "${local.cloud_composer["zone"]}"
machine_type = "${local.cloud_composer["machine_type"]}"
}
}
}
You get the value of a key value pair in a map with the name of the key.
Conclusion
You just created a simple infrastructure in a GCP project using Terraform code. Giving you the capability to create an other environment in a second GCP project with exactly the same infrastructure, or simply recreate everything when something got messed up.
There are a plenty of other resources in GCP you can create with Terraform, from service accounts and Google IAM Roles to PubSub subscriptions. Click here for the full list of GCP resources you can create with Terraform and the details about the corresponding Terraform code.
Discover our company culture
We are experts with a passion for technology and a drive to use it to achieve the best results for our clients, society and ourselves. We strongly believe that technical communities are the core of innovation. Together we continuously explore the newest and coolest technologies. Are you ready to be a part of that?

